I like to title this segment “Holy crap I got accepted!” The previous installment of Vendor Virgin covered narrowing down your choices for shows and applying to juried and non-juried shows. Once you’re accepted, it’s off to the races – let the preparation begin! After a few shows this will be old hat, but preparing for the first time is nerve-wracking.
What to bring to the show
Clearly you must bring your products, but there are so many other items to bring that I run the danger of forgetting something without a checklist. I’ve created a downloadable Vendor Checklist to help you keep track when packing up and loading the car for the show.
There are a few essentials – don’t forget your booth fee when getting change for your cash box! Event instructions and Google Maps directions to the event are a must. Vendor permits are not always required for craft shows – it depends on the city, county and state you live in. Contact the event organizer or city offices about special event permits to be sure.
Basic booth supplies may be partially provided by the event. Table and chairs are commonly supplied by the organizers at indoor shows, but outdoor shows may leave you on your own to set up a tent, tables and displays. Make sure to figure out if power is provided or available for an additional fee if you have lighting or displays that require it.
A professionally-printed vinyl banner will class up your booth and can generally be made locally for $60-100. Provide your logo to the sign shop in vector format so that it doesn’t look blurry when blown up; if it was not designed this way, you may be able to whip one up with Inkscape, a free vector graphics program. Ask the sign shop about materials (some are better for crisp displays indoors, others better for durability outdoors) and make sure that grommets are installed to hang the sign. A 4×2′ sign is a good general-purpose size for 6′ indoor tables and outdoor tent setups.

You’ve gotta spend money to make money! Bring change for those first few customers. I like to bring a locking cash box with $50-70 in fives and ones – tens and twenties won’t be a problem once you start selling items. Cash boxes can be stolen from craft show booths, so an apron with pockets or a small purse kept on your person may be a better option if you’ll be roaming around. For most shows, you’ll be responsible for sales tax appropriate for the city, county and state that you’re selling in. I strongly suggest offering fixed-dollar pricing (“I pay the tax”) to prevent the need for coins. Download my Fixed Pricing Worksheet to help figure out what to pay in taxes. If you choose to add the sales tax onto the prices, you’ll want to print up a cheat-sheet with your item prices and corresponding sales tax. A two-part (carbon copy) receipt book is handy to provide a written receipt when customers want one.
Business cards are essential; for every sale you get, you’ll hand out a dozen business cards to interested customers who aren’t quite ready to bite. This promotion will pay dividends later in your online shop. Business cards are also a great help for networking with your fellow crafters at the show. Make sure your website and email address are on the card or you’ll find yourself writing it on each one! I order mine from VistaPrint.com – very affordable prices and they have a downloadable template if you want to make your own design in Word. Beware the upsell on this site! Focus on the prize and you should be able to sneak away with 250 or 500 business cards for $10-20 (although I wish I’d bitten on the custom stamp for my product bags).
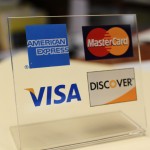 Accepting credit cards is absolutely huge, especially if your items exceed the $10-20 range. I use a Square card reader – the company sends you the reader free and the rate is only 2.75% per purchase. It’s a very competitive and an attractive option, but it only works with the iPhone, iPad, or Android phones. Another common option among Etsy sellers is ProPay.com that offers a micro card reader you can attach to a laptop for $100. If you’re able to use either of these options, make sure to advertise it. Surprisingly this is still rare among craft show vendors and is a real bonus to your booth.
Trucking your items and supplies back and forth to the booth is something that many first-time craft vendors overlook. Bring a dolly or suitcase with wheels to make life easier – I use a folding crate with wheels that collapses to stow away after the show. You’ll also want an emergency kit with basic supplies that you never expected you’d need. Check out the Vendor Checklist for the items I keep in my emergency kit. These have come in handy more times than I can count! There are also miscellaneous supplies on the checklist, like trash bags for waste and sunscreen for outdoor shows.
Mock setup
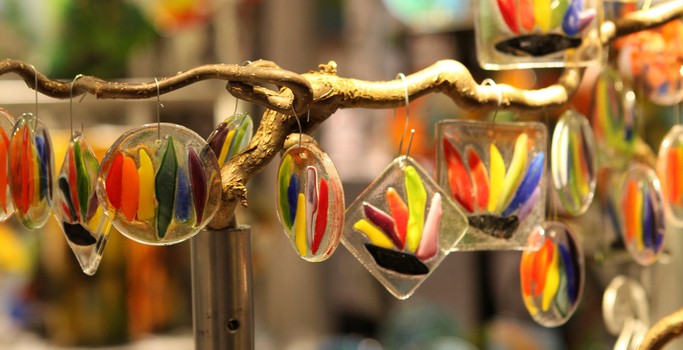
The best way to get your booth organized and figure out what you need before the show is to prepare a mock setup of the booth. Set up a table in your living room or tent in the backyard the same way you’d set up the booth at the show. Make sure you have a table cloth that reaches near the floor – no one likes to see supply boxes and table legs from across the room! Craft show veterans will tell you that the best displays make use of vertical space to create height and dimension on the tables; the shoddiest booths have items laying flat on a table facing the ceiling. Use fabric-covered boxes and display stands to bring items up to eye-level and facing the customers. The tchochkes from around your house can be dual-purpose to help to spice up the display. Be wary of using standing shelves next to your booth, as the lower shelves will escape the notice of most shoppers.
Make sure that everything is visible at a glance; many shoppers will have commitment issues when approaching your booth and will hesitate when items are not clearly visible. The booth should also be focused and have distinct displays for your different items. Shoppers are easily overwhelmed by a vast and varied collection of items and will gravitate towards what interests them if it’s presented in a focused manner with other like items. Business cards should be prominent and “grabbable” for those tentative shoppers who aren’t ready to buy on the spot. Clear signage and pricing is also a must – many customers will not ask for prices if they are not prominently displayed.
How to sell your items
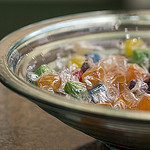 The key to selling your items is drawing people to the booth. Keep your most eye-grabbing item near the front of the booth to attract attention. Many sellers like to offer free samples or even put a candy bowl at the front of the booth. This not only plays on the principle of reciprocity but can also be a lure for your most valuable customers – children! This was surprising to learn about – having samples or items that appeal to children can be an enormous draw to your booth. Kids are eager to see cool stuff and ask questions and will often get their parents into the shop who might not have otherwise stopped in. Chatting up these youngsters will also help you learn about what is most appealing about your items.
For those that ask about your items, it’s important to know everything you can about the materials and techniques used in creating the items. Shoppers will be much more intrigued when you can tell a story about your item. Let people know if your sterling silver lobster clasps are made by a local company, or how you tried twenty different types of yarn before finding the best one for your knitting. Being able to tell customers where your supplies come from and why you chose them for your creations will build a personal connection with your items that people can talk about when they take them home.
A portfolio or slideshow can be another great way to showcase the items that may or may not be at your booth. My slideshow is loaded up with previously sold items and things available online that are not at the booth. It’s a great way to show examples of your work and offer something interesting for people to look at. I use the iPad picture frame mode to display an easy slideshow. A tablet or laptop PC can also display a slideshow with Google’s free Picasa program. These tech items can be costly if you don’t have them already, so another great option is simply to print out color photos and put them in protective sleeves in a binder for people to look through.
The best way to sell the items is a great attitude during the show. You’ll never quite feel ready for the show your first time. Embrace this uncertainty and know that the show will be a great experience. It is absolutely the best way to get an honest and engaging connection with your customers. Tune in next time to learn more about what to do during the show in Part 4, Vendor Virgin: Working the Craft Show.