
29 Mar Mastering Camera Settings
Manual camera settings are intimidating. I was able to ignore them on my old compact camera. It had them tucked away beneath a sign “Abandon hope all ye who enter here.” I bought a DSLR years ago that has the manual settings front and center, begging to be used. It’s clear that a big disappointed sigh is let out every time you set the camera to auto mode.
I had the best intentions when I bought it; I imagined mastering all the advanced settings and producing sparkling, professional images within days of my purchase. To my credit, I did skim the manual after it arrived. Mostly to learn how to set auto mode. That’s what we have technology for, right? If the camera can’t figure out the best settings, it’s going to be gravely disappointed when I try to direct it on how to take pictures.
I felt a bit guilty. I also started to notice problems in my product shots. The photos of my blue items have a blue tint. I couldn’t get the whites quite white enough. How do you get that neat blurred background effect where only your product is in focus? I started to doubt the wisdom of auto mode.
Cameras aren’t as smart as I thought. Sometimes there are several “correct” configurations of settings and the camera can’t always pick the best one. The camera doesn’t know if you’re using a tripod, what “white” means under different lighting situations, or how you want the shot to look. Manual settings let you instruct the camera on how to take a better picture. Hey camera, I’m using incandescent lighting so take that into account. Psst camera, the item I’m focusing on is way more important than that junk I have in the background – feel free to make that blurry.
I want to explore some photography concepts and try to explain them in clear language. If you’re intimidated by manual settings like me, I hope to give you enough knowledge to start experimenting with your own camera.
Exposure
The shutter on the front of a camera opens and closes when a picture is taken, letting in a certain amount of light to capture the scene. The amount of light collected is called the exposure. Most manual camera settings are focused on getting just the right amount of exposure.
Too much light over-exposes the photo, which makes bright highlights appear washed out. It can be used for artistic effect, but it’s generally bad because detail is permanently lost in the bright areas. Too little light makes the photo appear muddy – the black areas blur together as detail in dark areas is lost.


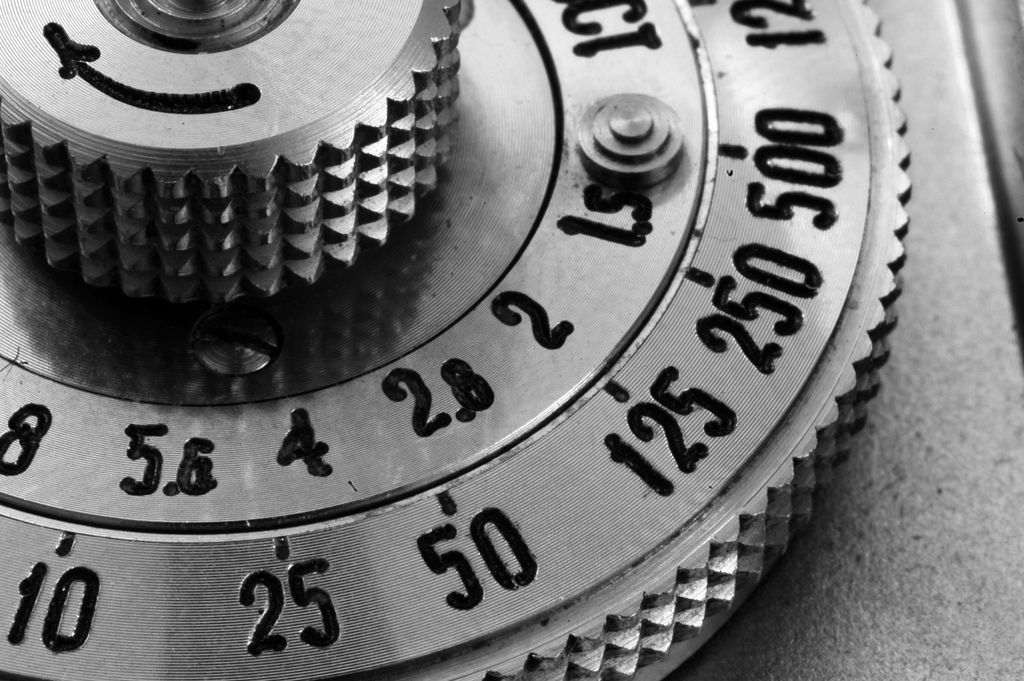
There are only three settings on a camera that control exposure levels – aperture, shutter speed and ISO speed. It seems like there should be one setting – a big dial that says more light and less light. Three settings makes it more complicated to figure out the right combination, but it also gives you more power over the outcome of the shot.
Aperture/F-Stop
The shutter on the camera doesn’t just open and close, it opens a certain amount. The amount it opens is called the aperture; opening the shutter all the way is full aperture, while smaller aperture settings tell the camera to open the shutter just a little bit.
The aperture setting controls how much light gets into the camera, so it clearly has an effect on exposure. Wide apertures also allow light to enter the camera at greater angles. The light angles are important because it directly relates to focus. Cameras, like our eyes, are able to make adjustments to focus on items at a certain distance.
Try this experiment – hold your finger up close to your face and focus on it with one eye closed. Notice what happens to things in the background – they get blurry. If you focus on something behind your finger, the finger gets blurry. Focusing your eyes or a camera lens involves getting the light to come in at just the right angle so that the object in focus appears sharp. Getting the light angles right for your finger to appear sharp makes it so the angles aren’t quite right for objects closer or further away, which makes them appear blurry.


In the images above, the left image was taken with a wider aperture. The wide aperture increases the light angles, making the plants behind it appear blurrier. The effect works well for a photo focusing on a single item like the flower; for photos where you want the entire scene in focus, like a landscape shot, a smaller aperture will reduce the light angles and make the whole scene sharper.
Photography has a fancy term for this effect called depth of field. To break it down, field refers to things that are acceptably sharp and depth is a measure of distance. So depth of field is talking about how far things can be away from the focal point and still appear sharp. The image on the left has a wide aperture, increasing the light angles and making the depth of field narrower. Shrinking the aperture allows the depth of field to widen, so that the plants in the background of the right image are sharper even though they’re far away.
Aperture is measured with units called f-stops (focal-stops). The units seem confusing at first, since a smaller number indicates a wider aperture; in the photos above, the wider aperture on the left is f/5 and the narrower aperture on the right is f/32. This is due to f-stops being a ratio between the focal length and aperture size. The ratio uses fractional powers of the square root of 2, so I assume you’ll thank me for skipping the details. The important thing to know is that a smaller number in the f-stop setting means a wider aperture, and each step down on the f-stop scale halves the area of the opening.
Shutter speed
Shutter speed controls how long the shutter of the camera is open when taking a photo. Since aperture controls how wide the shutter opens and shutter speed controls how long it’s open, these two settings work in concert to control the amount of light captured.
Long shutter speed will allow more light into the camera, which might be necessary with a narrow aperture or at night when there’s less light in general. It also increases blur when objects in the photo are moving during the exposure. Notice the fancy terms I used in those sentences? Now we’re talking shop like the pros.


Blur isn’t always a bad thing! These photos use a long shutter speed artistically to give the effect of motion. Shutter speed is measured in seconds or fractions of a second. The photo on the left has a shutter speed of 30 seconds; that’s more akin to old-fashioned photographs – nobody move for 30 seconds! Standard photos will use a shutter speed more like 1/50th or 1/100th of a second.
ISO speed
Since aperture and shutter speed alone control the amount of light captured in a photo, what’s this ISO speed nonsense? Imagine that you’re taking a photo at a dimly-light concert. Since you want to capture the whole scene clearly, the aperture must be narrow. The band and fans are jumping around, so a long shutter speed would just lead to a mess of blurry people. Setting a narrow aperture and fast shutter speed will surely lead to under-exposure, since there’s not enough light in the room to capture.
ISO speed lets you make do with less light. It’s a measure of sensitivity – higher ISO speed tells the camera to be more sensitive to light. In the concert example, you might be able to get a decent photo with a narrow aperture and fast shutter speed if you kick up the ISO speed. The camera won’t get much light, but it will pay really good attention to the light it does get.


These photos are taken in rather dim settings with high ISO speeds. ISO speed isn’t without caveats. Look closely at the photos above, especially the dark areas – you’ll see speckles of random color called image noise. Noise happens because light isn’t pure. Light reflects a little randomly; the explanation dips into quantum fluctuations and photons, so I’ll wave my hands and skip over that part.
Needless to say, with more light the camera can more confidently say “Yes, this is purple, I’ve sensed 10 purple signals and only 1 of this other color – that must be noise.” With less light and a higher ISO speed, the camera might be forced to say “Well, I’ve gotten 2 purple signals and 2 greenish signals. I’m really not sure what’s noise – how about something in between?”
White balance
Unlike the other settings, white balance doesn’t relate to exposure – it adjusts the color temperature. It sounds a bit silly for color to have temperature, but if you’ve heard the term “white hot” or experienced the harsh glow of fluorescent lights, you know a little something about color temperature.
If you have soft white incandescent bulbs in your house somewhere, walk into the room with a white sheet of paper and look closely at the paper. It doesn’t actually look white – more like a light yellow. Our eyes and mind are remarkably adept at figuring this out. “Hey, everything in here has a yellow hue – I’ll adjust my color expectations accordingly.” Cameras see things more literally.
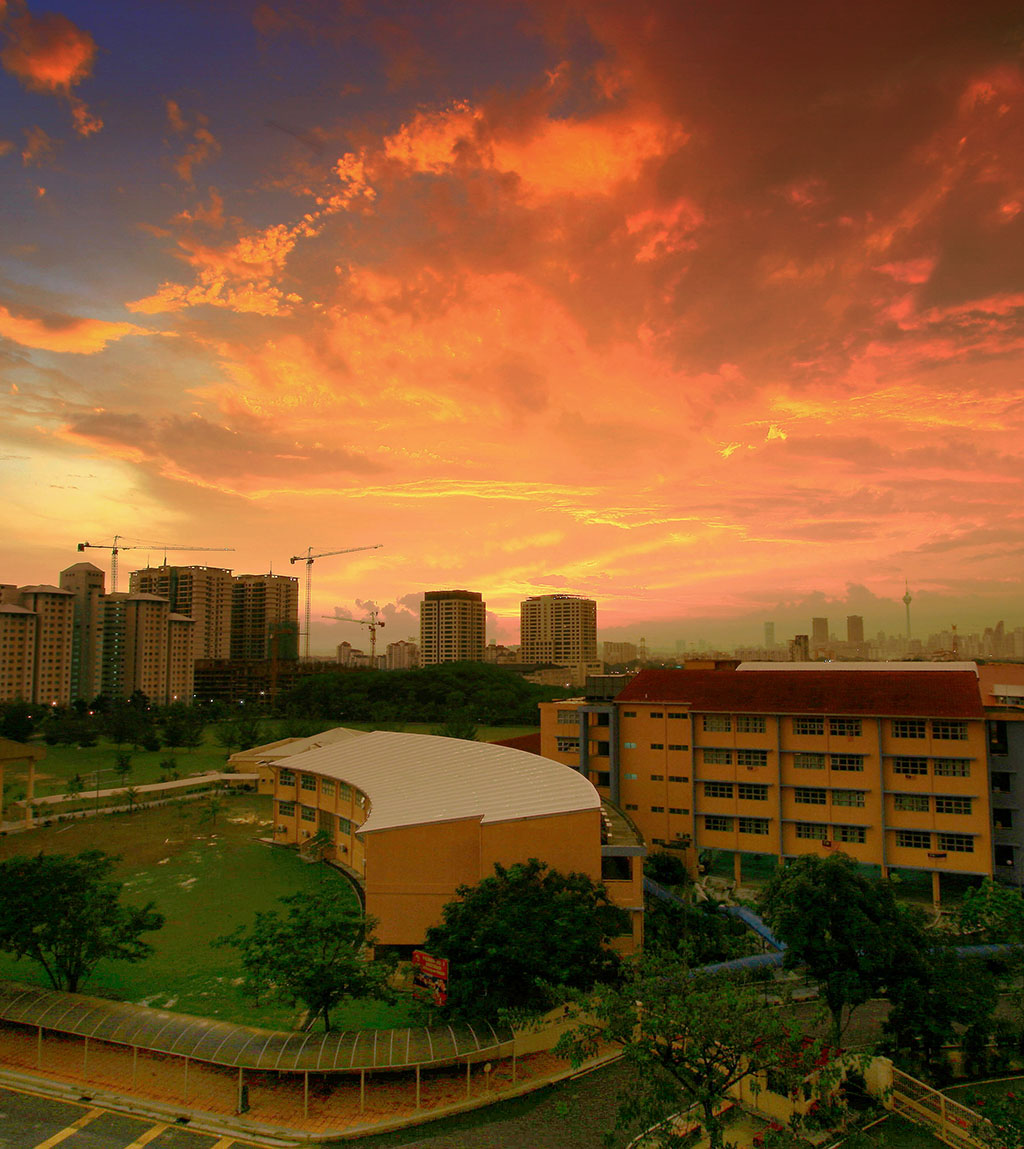

The images above are the same scene with very different color temperatures. The left image has a warm color temperature while the right is quite cool. The terms warm and cool make intuitive sense – fire is warm and red, ice is cool and blue. In the photos, the top of the building is white, but taken literally it looks either light orange or light blue.
White balance gives the camera a hint as to the ambient color temperature. If your photos have a blue tint, the camera thought the light in the room was warmer than it actually was. Most cameras have white balance presets that let you give the camera a hint about the color temperature. Some cameras have real temperature measurements like 5000K (5,000 degrees Kelvin); others give a bit more sensible guidance with settings like “Incandescent” and “Fluorescent.”
The most accurate way to measure color temperature is with a chroma meter. Since those cost thousands of dollars, I’ll assume you don’t have one handy and suggest the next best thing – a set of white balance cards that cost under $10.
Imagine the simplest way to tell your camera the temperature – point at something white and say “Hey camera, that’s white.” The cards are neutral colors and help the camera understand what’s going on with the lighting. Most DSLRs and other high-end cameras have a manual white balance setting that lets you do exactly that. Point at a white balance card and tap the photo button – the camera will figure out the temperature and use it for the rest of your photos in that session.
Manual settings take some experimentation to use correctly, but knowing how each setting affects the photo will put you on the right track. I’m still working out the kinks in my own photos and exploring the camera. Product shots are the perfect way to try out manual settings – you can set up the shot and retake photos several times with different settings to compare. Stick to auto mode for the candid family shots.
Photos won’t always come out perfectly even with skilled use of manual settings. In an upcoming article, I’ll give an overview of photo editing software that can turn good photos into great photos. Stay tuned!
[flickr]Flickr photo credits: Cover photo by Eugene Yurevich. Overexposed by Darren Webb. Underexposed by Steph Dunn. Waterfall by baaker2009. Night walk by dmvdberg. Concert by ArtBrom. Dusk photos by Khairil Faizi.[/flickr]
Get my latest articles straight to your inbox about once a month. Learn how to improve your Etsy shop, boost your sales and discover other sellers from the Etsy community.
Dawn
Posted at 19:28h, 13 DecemberThis is exactly the post I needed. I’ve recently upgraded from a point n shoot to a canon 550D and feel a bit lost with it. Thanks for sharing such great info!
Trudy Connor
Posted at 19:17h, 02 SeptemberI am bookmarking this page to return to as I learn more about my camera functions.
Thank you
Sharon Adkison
Posted at 11:07h, 04 AprilWow, Brittany, it is obvious that you are mastering your camera! It is great that you are sharing that knowledge with others!
Cheryl Dunham
Posted at 07:30h, 30 MarchThank you for this great information. This helps me to understand my camera a little better. I make jewelry, and have a hard time getting just the right picture of the jewelry. Again Thanks